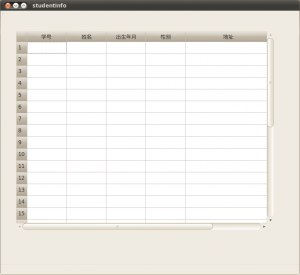
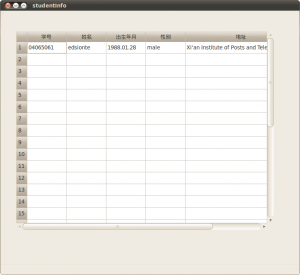
QTableWidget类提供了一种基于条目(item)的表格视图模型,在该部件中数据以item为基本单位,每条数据(item)对应一个QTableWidgetItem类的对象,所有数据形成的item组成整个表格。接下来我们创建一个用来显示学生信息的表格,以此为例说明TableWidget的一些常用功能。
1.创建QTableWidget
首先创建studentInfo类,然后在Qt Desinger模式下创建一个QTableWidget部件,对其命名为stuTableWidget。通过在该部件上点击右键创建列项表头,创建完毕后也就同时指定了该表格的列项数。如下:
2.初始化
除了直接在设计模式下创建行数和列数外,我们还可以通过调用相应的方法来设定。比如我们通过setRowCount方法在studentInfo类的构造方法中即可指定行项数。
ui->stuTableWidget->setRowCount(30);
该方法在创建行的同时会自动创建一个用来显示行号的列项,如下:
如果我们的表格只用来显示信息,并不涉及对相应信息的修改,则可以通过下述方法将表格设置为只读模式:
ui->stuTableWidget->setEditTriggers(QAbstractItemView::NoEditTriggers);
setEditTriggers()是QAbstractItemView类中的一个方法,通过向该方法传递相应的参数以设置item的一些属性,比如NoEditTriggers参数可将item设置为只读,DoubleClicked代表双击时item可修改。而QTableWidget继承了QAbstractItemView方法,因此它可以使用该函数。
3.信息显示
表格视图中数据的获取随用途的不同而不同。如果使用于C/S模型的客户端,那么表格中的信息需要从服务器端发送到本地,再相应解析;如果使用在数据库中,则需要从数据库中获取相应信息。这里假定数据已经到达本地,我们通过下面的方法来显示数据信息。
void studentInfo::showInfo()
{
    QTableWidgetItem *tmpItem;

    tmpItem = new QTableWidgetItem(QString("04065061"));
    ui->stuTableWidget->setItem(0, 0, tmpItem);

    tmpItem = new QTableWidgetItem(QString("edsionte"));
    ui->stuTableWidget->setItem(0, 1, tmpItem);

    tmpItem = new QTableWidgetItem(QString("1988.01.28"));
    ui->stuTableWidget->setItem(0, 2, tmpItem);

    tmpItem = new QTableWidgetItem(QString("male"));
    ui->stuTableWidget->setItem(0, 3, tmpItem);

    tmpItem = new QTableWidgetItem(QString("Xi'an Institute of Posts and Telecommunications"));
    ui->stuTableWidget->setItem(0, 4, tmpItem);
}
上述的showInfo方法为第一行设定了相应信息,我们可以看到表格的一行中每个具体的列项都对应一个QTableWidgetItem对象,并通过在setItem方法中指定行号和列号将该item对象设置到表格的具体位置。在上述的showInfo方法中,我们分别通过该方法创建了第一行的第一到第五列的数据(行列下表从0开始)。
4.为表格数据添加右键菜单
有时候我们想通过点击鼠标右键对表格数据进行一些其他操作,比如复制、查看详情等,我们可以按照下面的方法来实现。为了实现点击右键弹出菜单这个功能,我们必须在类studentInfo类中声明一个菜单变量popMenu和一个菜单选项变量action。
class studentInfo : public QMainWindow
{
…………
private:
    Ui::studentInfo *ui;
    QMenu *popMenu;
    QAction *action;

private slots:
    void on_stuTableWidget_customContextMenuRequested(QPoint pos);
…………
};
声明完毕后,我们在studentInfo类的构造函数中对其进行初始化,如下:
    ui->stuTableWidget->setContextMenuPolicy(Qt::CustomContextMenu);
    popMenu = new QMenu(ui->stuTableWidget);
    action = new QAction("Copy", this);
setContextMenuPolicy方法用来设置widget菜单项的显示方法,而CustomContextMenu是唯一与邮件菜单有关的参数,因此这里我们将菜单显示方法设置为该类型。如果widget设置为CustomContextMenu时,当在数据上点击右键时就会发送customContextMenuRequested ( const QPoint & pos )信号,该信号还会捕捉到点击右键的位置,并用pos参数来存储。与此信号关联的槽函数我们定义如下:
void studentInfo::on_stuTableWidget_customContextMenuRequested(QPoint pos)
{
    popMenu->addAction(action);
    popMenu->exec(QCursor::pos());
}
我们首先将菜单选项action添加到邮件弹出菜单popMenu中,再通过exec方法在pos()位置显示该邮件菜单,pos()返回的位置即为点击鼠标的位置。
现在,如果点击右键菜单选项并不会发生任何动作,这是因为我们并没有关联相应的槽函数。由于具体的菜单选项不同,其函数的实现也不同,这里我们只给出框架,如下:
void studentInfo::rightClickedOperation()
{
    //do something
}
定义好槽函数,最关键的是与相应的信号连接。对于上述两个槽函数,我们可以使用两种方法进行信号和槽的关联:在Qt Desinger模式下添加或手动进行connect关联。对于customContextMenuRequested信号,我们使用前种方法实现信号和槽的关联;对于右键菜单选项的功能实现,我们可以通过connect函数实现,如下:
connect(action, SIGNAL(triggered()), this, SLOT(rightClickedOperation()));


很有参考价值。
[回复一下]
楼主,请问按照你的思路去做,那个菜单没有显示出来??这个是什么原因呢?
[回复一下]