Last Update: 8/15
双链表的应用在内核中随处可见,list.h头文件集中定义了双链表(struct list_head结构体)的相关操作。比如这里的一个头文件中就有大量的struct list_head型的数据。
关于list.h的分析,网上资料很多,这里只是记录我在分析list.h中遇到的问题。
0.struct list_head结构体
可能这样写,更让我们习惯:
struct list_head {
struct list_head *next;
struct list_head *prev;
};
这个结构经常作为成员与其他数据类型一起组成一个新的结构体(后文若无特别提示,“新结构体”均指类似下面举例的嵌套型结构体),比如:
struct stu
{
	char name[20];
	int id;
	struct list_head list;
}
我们已经看到,struct list_head这个结构比较特殊,它内部没有任何数据,只是起到链接链表的作用。对于它当前所在的这个结点来说,next指向下一个结点,prev指向上一个结点。通常我们通过指向struc list_head的指针pos来获取它所在结点的地址,尽而获取其他数据。也许你现在还比较困惑这一过程,别着急,后面有特别解释。
1.链表的初始化
其实可以从后往前看,这样更容易理解。INIT_LIST_HEAD函数形成一个空链表。这个list变量一般作为头指针(非头结点)。
  28static inline void INIT_LIST_HEAD(struct list_head *list)
  29{
  30        list->next = list;
  31        list->prev = list;
  32}
下面的宏生成一个头指针name,如何生成?请看LIST_HEAD_INIT(name)。
  25#define LIST_HEAD(name) \
  26        struct list_head name = LIST_HEAD_INIT(name)
LIST_HEAD_INIT(name)将name的地址直接分别赋值给next和prev,那么它们事实上都指向自己,也形成一个空链表。现在再回头看宏LIST_HEAD(name),它其实就是一个定义并初始化作用。
23#define LIST_HEAD_INIT(name) { &(name), &(name) }
3.添加元素
这两个函数分别给链表头结点后,头结点前添加元素。前者可实现栈的添加元素,后者可实现队列的添加元素。
static inline void list_add(struct list_head *new, struct list_head *head);
static inline void list_add_tail(struct list_head *new, struct list_head *head);
这两个函数如何实现的?它们均调用的下面函数:
  41static inline void __list_add(struct list_head *new,
  42                              struct list_head *prev,
  43                              struct list_head *next)
  44{
  45        next->prev = new;
  46        new->next = next;
  47        new->prev = prev;
  48        prev->next = new;
  49}
现在我们要关注的是,list_add和list_add_tail两函数在调用__list_add函数时,对应的各个参数分别是什么?通过下面所列代码,我们可以发现这里的参数运用的很巧妙,类似JAVA中的封装。
  64static inline void list_add(struct list_head *new, struct list_head *head)
  65{
  66        __list_add(new, head, head->next);
  67}

  78static inline void list_add_tail(struct list_head *new, struct list_head *head)
  79{
  80        __list_add(new, head->prev, head);
  81}
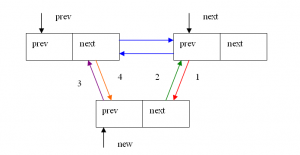
注意,这里的形参prev和next是两个连续的结点。这其实是数据结构中很普通的双链表元素添加问题,在此不再赘述。下面的图可供参考,图中1~4分别对应__list_add函数的四条语句。
这里又是一个调用关系,__list_del函数具体的过程很简单,分别让entry节点的前后两个结点(prev和next)“越级”指向彼此。请注意这个函数的后两句话,它属于不安全的删除。
 103static inline void list_del(struct list_head *entry)
 104{
 105        __list_del(entry->prev, entry->next);
 106        entry->next = LIST_POISON1;
 107        entry->prev = LIST_POISON2;
 108}
想要安全的删除,那么可以调用下面函数。还记得INIT_LIST_HEAD(entry)吗,它可以使entry节点的两个指针指向自己。
 140static inline void list_del_init(struct list_head *entry)
 141{
 142        __list_del(entry->prev, entry->next);
 143        INIT_LIST_HEAD(entry);
 144}
4.替换元素
用new结点替换old结点同样很简单,几乎是在old->prev和old->next两结点之间插入一个new结点。画图即可理解。
120static inline void list_replace(struct list_head *old,
 121                                struct list_head *new)
 122{
 123        new->next = old->next;
 124        new->next->prev = new;
 125        new->prev = old->prev;
 126        new->prev->next = new;
 127}
同样,想要安全替换,可以调用:
 129static inline void list_replace_init(struct list_head *old,
 130                                        struct list_head *new)
 131{
 132        list_replace(old, new);
 133        INIT_LIST_HEAD(old);
 134}
5.移动元素
理解了删除和增加结点,那么将一个节点移动到链表中另一个位置,其实就很清晰了。list_move函数最终调用的是__list_add(list,head,head->next),实现将list移动到头结点之后;而list_move_tail函数最终调用__list_add_tail(list,head->prev,head),实现将list节点移动到链表末尾。
 151static inline void list_move(struct list_head *list, struct list_head *head)
 152{
 153        __list_del(list->prev, list->next);
 154        list_add(list, head);
 155}
 156

 162static inline void list_move_tail(struct list_head *list,
 163                                  struct list_head *head)
 164{
 165        __list_del(list->prev, list->next);
 166        list_add_tail(list, head);
 167}
6.测试函数
接下来的几个测试函数,基本上是“代码如其名”。
list_is_last函数是测试list是否为链表head的最后一个节点。
 174static inline int list_is_last(const struct list_head *list,
 175                                const struct list_head *head)
 176{
 177        return list->next == head;
 178}
下面的函数是测试head链表是否为空链表。注意这个list_empty_careful函数,他比list_empty函数“仔细”在那里呢?前者只是认为只要一个结点的next指针指向头指针就算为空,但是后者还要去检查头节点的prev指针是否也指向头结点。另外,这种仔细也是有条件的,只有在删除节点时用list_del_init(),才能确保检测成功。
 184static inline int list_empty(const struct list_head *head)
 185{
 186        return head->next == head;
 187}

 202static inline int list_empty_careful(const struct list_head *head)
 203{
 204        struct list_head *next = head->next;
 205        return (next == head) && (next == head->prev);
 206}
下面的函数是测试head链表是否只有一个结点:这个链表既不能是空而且head前后的两个结点都得是同一个结点。
226static inline int list_is_singular(const struct list_head *head)
227{
228        return !list_empty(head) && (head->next == head->prev);
229}
7.将链表左转180度
正如注释说明的那样,此函数会将这个链表以head为转动点,左转180度。整个过程就是将head后的结点不断的移动到head结点的最左端。如果是单个结点那么返回真,否则假。
212static inline void list_rotate_left(struct list_head *head)
213{
214        struct list_head *first;
215
216        if (!list_empty(head)) {
217                first = head->next;
218                list_move_tail(first, head);
219        }
220}
上述函数每次都调用 list_move_tail(first, head);其实我们将其分解到“最小”,那么这个函数每次最终调用的都是:__list_del(first->prev,first->next);和__list_add(list,head->prev,head);这样看起来其实就一目了然了。
8.将链表一分为二
这个函数是将head后至entry之间(包括entry)的所有结点都“切开”,让他们成为一个以list为头结点的新链表。我们先从宏观上看,如果head本身是一个空链表则失败;如果head是一个单结点链表而且entry所指的那个结点又不再这个链表中,也失败;当entry恰好就是头结点,那么直接初始化list,为什么?因为按照刚才所说的切割规则,从head后到entry前事实上就是空结点。如果上述条件都不符合,那么就可以放心的“切割”了。
257static inline void list_cut_position(struct list_head *list,
258                struct list_head *head, struct list_head *entry)
259{
260        if (list_empty(head))
261                return;
262        if (list_is_singular(head) &&
263                (head->next != entry && head != entry))
264                return;
265        if (entry == head)
266                INIT_LIST_HEAD(list);
267        else
268                __list_cut_position(list, head, entry);
269}
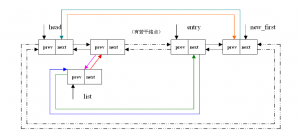
具体如何切割,这里的代码貌似很麻烦,可是我们画出图后,就“一切尽在不言中”了。
231static inline void __list_cut_position(struct list_head *list,
232                struct list_head *head, struct list_head *entry)
233{
234        struct list_head *new_first = entry->next;
235        list->next = head->next;
236        list->next->prev = list;
237        list->prev = entry;
238        entry->next = list;
239        head->next = new_first;
240        new_first->prev = head;
241}
图示:


cool
[回复一下]
另外,这种仔细也是有条件的,只有当其他cpu的链表操作只有list_del_init()时,否则仍然不能保证安全。
不知道这句话该怎么理解啊?
[回复一下]
edsionte 回复:
6 7 月, 2012 at 10:52
@hshopeful, 如果删除节点使用的是list_del_init函数,那么list_empty_careful才会成功。
[回复一下]
好详细,这次对内核中的链表又有了更深的理解,谢谢学长!
[回复一下]
edsionte 回复:
14 10 月, 2013 at 15:06
@崔姣姣, xy的学生?
[回复一下]
崔姣姣 回复:
23 10 月, 2013 at 21:06
@edsionte, 是的
[回复一下]
你的网站非常好,
给一点小小的建议,可不可以把网站的字体换一下,换成带衬线的?比如宋体。
[回复一下]
head->prev=new;
new->next=head;
new->prev=head->prev;
head->prev->next=new;
第三句不就是相当于new->prev=new了么,这样new的前驱指向自己了?
第四句不就相当于new->next=new了么,这样new的后驱也指向了自己?
查了很多资料 也搞不明白..
[回复一下]
edsionte 回复:
24 12 月, 2014 at 14:18
@李强, 那个函数中的?
[回复一下]
前辈您好:
请问下第七个,将链表左转180度是个什么意思?是要达到什么效果?有没有什么实际应用意义呢?
[回复一下]
追问,外面应该还需要循环嵌套调用吧?
[回复一下]
第8个将链表一分为二改为截取链表是否更合适?
[回复一下]