Posts Tagged ‘kernel’

在内核中新增驱动代码目录(1)

8 9 月, 2010

Step by Step

如果学习Linux下驱动开发,那么本文所述的“在内核中新增驱动代码目录”应该是一个最基本的知识点了。那么如何将自己写好的驱动程序新增到内核?本文将一步一步的教会你。

1.在正式开始之前,请先切换到root用户:su root。不过可能会会出现问题:不管你输入什么密码,都会提示你错误(很可能是因为之前你根本未设置过密码)。这时候我们来修改root用户的密码:

sudo passwd root

输入两次后,即可修改完毕,这下再su root就可以成功切换到root用户。

2.你可以现在试着在终端输入make menuconfig,终端会提示你:make: *** 没有规则可以创建目标“menuconfig”。这是因为menuconfig涉及到图形界面,所以我们得安装一些依赖包(ubuntu下):sudo apt-get install libncurses5-dev。

3.在一般的教程中,都会提到.config文件,而且这个文件就位于内核代码的根目录下。因此我会输入命令:ls -a来寻找.config。可是找来找去都没有这个文件的踪影。这是为什么?这是因为在这之前,你从来没有进行过内核配置,所以当然就不会生成.config文件了。解决的方法也很简单,有了上面两步的准备工作,那么你应该会成功进入配置用户界面,然后什么也不做,保存退出即可。那么你再ls一下,你可以发现.config已经存在了。

在开始向加入驱动代码之前,我们先了解三项基本步骤:

(1)将编好的源代码复制到Linux内核源代码的相应目录

(2)在目录的Kconfig文件中增加新源代码对应项目的编译配置选项

(3)在目录的Makefile文件中增加对新源代码的编译条目

在完成上述三项工作之前,我们先看一下我们要新增的驱动的树形结构。比如我们写的驱动程序均放在edsionteDriver目录,在此目录中包含Kconfig,Makefile和test.c三个文件,以及Key和led两个目录。我们先提前创建好这些文件,请注意本文只是为了演示说明,如果实际应用,像key,led以及test.c这样的文件都是有实际意义的。那么现在复制到内核源码目录下的driver/目录下即可。

|– edsionteDriver
|    |– Kconfig
|    |– Makefile
|    |– key
|        |– Kconfig
|        |– Makefile
|        |– mykey.c
|    |– mydriver.c
|    |– mydriver_user.c

现在我们完成了第一步工作,你应该注意到,我们现在只是创建了各个目录下的Kconfig和Makefile文件,并没添加相关内容,所以接下来我们就来进行这两个文件的编写。

对于初学者来说,直接学习Makefile以及Kconfig的编写可能会有些眩晕甚至排斥学习,不过我们可以先了解这两个文件在实际的内核分析中有什么作用。一般来说,对于内核这个庞大的网络,想要快速定位你所关心的代码就需要首先分析某个目录下的Makefile以及Kconfig文件,它们可是我们分析内核代码的goole map。

比如我们要分析ext3类型的文件系统,那么我们进入源码目录下fs/ext3/目录中,我们打开此目录的Makefile文件:

  1 #
  2 # Makefile for the linux ext3-filesystem routines.
  3 #
  4
  5 obj-$(CONFIG_EXT3_FS) += ext3.o
  6
  7 ext3-y  := balloc.o bitmap.o dir.o file.o fsync.o ialloc.o inode.o \
  8            ioctl.o namei.o super.o symlink.o hash.o resize.o ext3_jbd.o
  9
 10 ext3-$(CONFIG_EXT3_FS_XATTR)     += xattr.o xattr_user.o xattr_trusted.o
 11 ext3-$(CONFIG_EXT3_FS_POSIX_ACL) += acl.o
 12 ext3-$(CONFIG_EXT3_FS_SECURITY)  += xattr_security.o

我们应该先注意到7,8行,其定义了ext3变量(-y说明是多文件模块的定义,可以先忽略)。这里的定义变量类似于C语言中的宏定义,就是用ext3代替后面的.o文件列表。那么现在我们就可以知道与ext3模块最直接相关的就是后面这些文件对应的.c以及.h文件了,这些文件在源码相应的目录下都可以找到。那么ext3.o是否被编译取决于第的CONFIG_EXT3_FS,这个变量的值一般取y或n(甚至m)。它一般对应的是用户在配置界面时的输入。想要了解配置界面的菜单选项,就得看Kconfig文件。由于我们只关心EXT3_FS这个选项,因此我们相应的找到EXT3_FS这个选项的配置语句即可:

config EXT3_FS
	tristate "Ext3 journalling file system support"
	select JBD
	help
	  This is the journalling version of the Second extended file system
	  (often called ext3), the de facto standard Linux file system
	  (method to organize files on a storage device) for hard disks.
         #Other code was deleted

上述代码中,select说明只有JBD被配置,EXT3_FS这个配置项目才会在配置菜单上出现(事实上两者有更具体的依赖关系,可参考相关语法)。在配置菜单上会显示tristate后面的字符串,当用户选择配置此条目的情况下(有y,m和n三态选项),对应在Makefile文件中的CONFIG_EXT3_FS就对应为y。即obj-y的情况下,ext3.o菜会被编译。

现在将Makefile和Kconfig文件再串通起来想想,你应该会明白它们的作用。

一般来说,Makefile定义了根据该子目录下的源码文件构建目标文件的规则。像我们刚说的那个变量的定义以及根据CONFIG_EXT3_FS选项是否编译ext3.c文件。至于这些规则是否被执行,就取决于用户在配置菜单上是否选择配置这个选项,而这个配置菜单中配置选项就对应Kconfig文件。而且用户输入的配置结果会记录在.config文件当中。

通过上面的简单举例,我们可以先大致了解Makefile、Kconfig以及.config三者之间的关系以及作用。我们刚才分析的是内核中已经写好的代码的配置规则。对于我们上面所说的新增edsionteDriver驱动,应该如何添加?

具体添加过程请参见:在内核中新增驱动代码目录(2)。
list.h的简单应用

18 8 月, 2010

既然我们分析了list.h,那么就要学以致用,因为通过具体的例子我们才能真实感受到双链表的用法。本文首先为你呈现一个最基本的双链表使用方法,然后在引用另外两个例子,大家可以去亲自试试。

1.简单的学生管理系统

这里学生管理系统只是个基本模型:用户输入数据,然后通过输出重定向到stuInfo.txt文件当中。先看学生信息数据结构:

struct postinfo
{
	char id[20];
	char name[20];
	char sex[10];
	char addr[50];
	char email[20];
	struct list_head list;
};

正如我们前面所说的那样,整个双链表是通过struct list_head结构链接起来的,这样我们每次对某个结点的操作,都是先获得list字段的地址,进而通过list_entry宏获得当前结点的地址。

首先,创建头指针。注意我这里说的是头指针,并不是头结点,因此你应该可以理解为什么下面会首先创建一个struct list_head类型的变量,而不是struct postinfo类型的变量。

	struct list_head head;
	INIT_LIST_HEAD(&head);

创建好头指针,我们接下来就去增加学生信息。每次都先生成一个struct postinfo类型的变量tmp,再将每次要增加的信息都暂时保存在此变量中,接着就利用上次我们所说的增加函数:

list_add_tail(&(tmp->list),head);

注意这里我们使用的是&(tmp->list),正如我们一开始所说的每次对结点的操作实际上都是通过list字段去完成的。

添加完毕后,如何去打印数据?使用我们的遍历宏。pos只是一个struct list_head类型的指针,这个宏会首先使得pos指向head->next,即list链表的第一个结点(而非第一个学生信息结点)。每次移动链表后,通过pos获得当前结点的地址,那么就可以获得其他数据字段的地址了。

	list_for_each(pos,head)
	{
		pinfo=list_entry(pos,struct postinfo,list);
		printf("%s %s %s %s %s\n",pinfo->id,pinfo->name,pinfo->sex,pinfo->addr,pinfo->email);
        }

这个演示程序关键部分就是这样,其他地方只要你有C语言基础,就可以完成的。

2.遍历进程

具体过程请点击这里

list.h头文件分析(2)

13 8 月, 2010

Last Update:8/27

Last Update:8/15

9.合并链表

既然我们可以切割链表,那么当然也可以合并了。先看最基本的合并函数,就是将list这个链表(不包括头结点)插入到prev和next两结点之间。这个代码阅读起来不困难,基本上是“见码知意”。

 271static inline void __list_splice(const struct list_head *list,
 272                                 struct list_head *prev,
 273                                 struct list_head *next)
 274{
 275        struct list_head *first = list->next;
 276        struct list_head *last = list->prev;
 277
 278        first->prev = prev;
 279        prev->next = first;
 280
 281        last->next = next;
 282        next->prev = last;
 283}

理解了最基本的合并函数,那么将它封装起来,就可以形成下面两个函数了,分别在head链表的首部和尾部合并。这里的调用过程类似增加,删除功能。

 290static inline void list_splice(const struct list_head *list,
 291                                struct list_head *head)
 292{
 293        if (!list_empty(list))
 294                __list_splice(list, head, head->next);
 295}

 302static inline void list_splice_tail(struct list_head *list,
 303                                struct list_head *head)
 304{
 305        if (!list_empty(list))
 306                __list_splice(list, head->prev, head);
 307}

合并两个链表后,list还指向原链表,因此应该初始化。在上述两函数末尾添加初始化语句INIT_LIST_HEAD(list);后,就安全了。

10.遍历

下面我们要分析链表的遍历。虽然涉及到遍历的宏比较多,但是根据我们前面分析的那样,掌握好最基本的宏,其他宏就是进行“封装”。便利中的基本宏是:

381#define __list_for_each(pos, head) \
382        for (pos = (head)->next; pos != (head); pos = pos->next)

head是整个链表的头指针,而pos则不停的往后移动。但是你有没有觉得,这里有些奇怪?因为我们在上篇文章中说过,struct list_head结构经常和其他数据组成新的结构体,那么现在我们只是不停的遍历新结构体中的指针,如何得到其他成员?因此我们需要搞懂list_entry这个宏:

 348#define list_entry(ptr, type, member) \
 349        container_of(ptr, type, member)

这个宏的作用是通过ptr指针获取type结构的地址,也就是指向type的指针。其中ptr是指向member成员的指针。这个list_entry宏貌似很简单的样子,就是再调用container_of宏,可是当你看了container_of宏的定义后……

 443#define container_of(ptr, type, member) ({                      \
 444        const typeof( ((type *)0)->member ) *__mptr = (ptr);    \
 445        (type *)( (char *)__mptr - offsetof(type,member) );})

是不是让人有点抓狂?别急,我们一点点来分析。

首先这个宏包含两条语句。第一条:const typeof( ((type *)0)->member ) *__mptr = (ptr);首先将0转化成type类型的指针变量(这个指针变量的地址为0x0),然后再引用member成员(对应就是((type *)0)->member ))。注意这里的typeof(x),是返回x的数据类型,那么 typeof( ((type *)0)->member )其实就是返回member成员的数据类型。那么这条语句整体就是将__mptr强制转换成member成员的数据类型,再将ptr的赋给它(ptr本身就是指向member的指针)。

第二句中,我们先了解offsetof是什么?它也是一个宏被定义在:linux/include/stddef.h中。原型为:

#define offsetof(TYPE, MEMBER) ((size_t) &((TYPE *)0)->MEMBER);

这个貌似也很抓狂,不过耐心耐心:((TYPE *)0)->MEMBER)这个其实就是提取type类型中的member成员,那么&((TYPE *)0)->MEMBER)得到member成员的地址,再强制转换成size_t类型(unsigned int)。但是这个地址很特别,因为TYPE类型是从0x0开始定义的,那么我们现在得到的这个地址就是member成员在TYPE数据类型中的偏移量。

我们再来看第二条语句, (type *)( (char *)__mptr – offsetof(type,member) )求的就是type的地址,即指向type的指针。不过这里要注意__mptr被强制转换成了(char *),为何要这么做?因为如果member是非char型的变量,比如为int型,并且假设返回值为offset,那么这样直接减去偏移量,实际上__mptr会减去sizeof(int)*offset!这一点和指针加一减一的原理相同。

有了这个指针,那么就可以随意引用其内的成员了。关于此宏的更具体了解,不妨亲自动手测试这里的程序。

好了,现在不用抓狂了,因为了解了list_entry宏,接下来的事情就很简单了。

下面这个宏会得到链表中第一个结点的地址。

 359#define list_first_entry(ptr, type, member) \
 360        list_entry((ptr)->next, type, member)

真正遍历的宏登场了,整个便利过程看起来很简单,可能你对prefetch()陌生,它的作用是预取节点,以提高速度。

 367#define list_for_each(pos, head) \
 368        for (pos = (head)->next; prefetch(pos->next), pos != (head); \
 369                pos = pos->next)

我们再来看一开始我们举例的那个便利宏。注意它和上述便利宏的区别就是没有prefetch(),因为这个宏适合比较少结点的链表。

 381#define __list_for_each(pos, head) \
 382        for (pos = (head)->next; pos != (head); pos = pos->next)

接下来这个遍历宏貌似长相和上面那几个稍有不同,不过理解起来也不困难,倒着(从最后一个结点)开始遍历链表。

389#define list_for_each_prev(pos, head) \
 390        for (pos = (head)->prev; prefetch(pos->prev), pos != (head); \
 391                pos = pos->prev)

下面两个宏是上述两个便利宏的安全版,我们看它安全在那里?它多了一个与pos同类型的n,每次将下一个结点的指针暂存起来,防止pos被释放时引起的链表断裂。

399#define list_for_each_safe(pos, n, head) \
 400        for (pos = (head)->next, n = pos->next; pos != (head); \
 401                pos = n, n = pos->next)

 409#define list_for_each_prev_safe(pos, n, head) \
 410        for (pos = (head)->prev, n = pos->prev; \
 411             prefetch(pos->prev), pos != (head); \
 412             pos = n, n = pos->prev)

前面我们说过,用在list_for_each宏进行遍历的时候,我们很容易得到pos,我们都知道pos存储的是当前结点前后两个结点的地址。而通过list_entry宏可以获得当前结点的地址,进而得到这个结点中其他的成员变量。而下面两个宏则可以直接获得每个结点的地址,我们接下来看它是如何实现的。为了方便说明以及便于理解,我们用上文中的结构struct stu来举例。pos是指向struct stu结构的指针;list是一个双链表,同时也是这个结构中的成员,head便指向这个双链表;member其实就是这个结构体中的list成员。

在for循环中,首先通过list_entry来获得第一个结点的地址;&pos->member != (head)其实就是&pos->list!=(head);它是用来检测当前list链表是否到头了;最后在利用list_entry宏来获得下一个结点的地址。这样整个for循环就可以依次获得每个结点的地址,进而再去获得其他成员。理解了list_for_each_entry宏,那么list_for_each_entry_reverse宏就显而易见了。

 420#define list_for_each_entry(pos, head, member)                          \
 421        for (pos = list_entry((head)->next, typeof(*pos), member);      \
 422             prefetch(pos->member.next), &pos->member != (head);        \
 423             pos = list_entry(pos->member.next, typeof(*pos), member))

 431#define list_for_each_entry_reverse(pos, head, member)                  \
 432        for (pos = list_entry((head)->prev, typeof(*pos), member);      \
 433             prefetch(pos->member.prev), &pos->member != (head);        \
 434             pos = list_entry(pos->member.prev, typeof(*pos), member))

下面这两个宏是从当前结点的下一个结点开始继续(或反向)遍历。

 456#define list_for_each_entry_continue(pos, head, member)                 \
 457        for (pos = list_entry(pos->member.next, typeof(*pos), member);  \
 458             prefetch(pos->member.next), &pos->member != (head);        \
 459             pos = list_entry(pos->member.next, typeof(*pos), member))

 470#define list_for_each_entry_continue_reverse(pos, head, member)         \
 471        for (pos = list_entry(pos->member.prev, typeof(*pos), member);  \
 472             prefetch(pos->member.prev), &pos->member != (head);        \
 473             pos = list_entry(pos->member.prev, typeof(*pos), member))

与上述宏不同的是,这个宏是从当前pos结点开始遍历。

 483#define list_for_each_entry_from(pos, head, member)                     \
 484        for (; prefetch(pos->member.next), &pos->member != (head);      \
 485             pos = list_entry(pos->member.next, typeof(*pos), member))

接下来几个宏又分别是上述几个宏的安全版。安全原因上面已经说过,在此不再赘述。

list_for_each_entry_safe(pos, n, head, member)
list_for_each_entry_safe_continue(pos, n, head, member)
list_for_each_entry_safe_from(pos, n, head, member)
list_for_each_entry_safe_reverse(pos, n, head, member)

以上即是list.h头文件中的大部分内容分析。关于hash表部分在此暂不分析。

list.h头文件分析(1)

12 8 月, 2010

Last Update: 8/15

双链表的应用在内核中随处可见,list.h头文件集中定义了双链表(struct list_head结构体)的相关操作。比如这里的一个头文件中就有大量的struct list_head型的数据。

关于list.h的分析,网上资料很多,这里只是记录我在分析list.h中遇到的问题。

0.struct list_head结构体

可能这样写,更让我们习惯:

struct list_head {
struct list_head *next;
struct list_head *prev;
};

这个结构经常作为成员与其他数据类型一起组成一个新的结构体(后文若无特别提示,“新结构体”均指类似下面举例的嵌套型结构体),比如:

struct stu
{
	char name[20];
	int id;
	struct list_head list;
}

我们已经看到,struct list_head这个结构比较特殊,它内部没有任何数据,只是起到链接链表的作用。对于它当前所在的这个结点来说,next指向下一个结点,prev指向上一个结点。通常我们通过指向struc list_head的指针pos来获取它所在结点的地址,尽而获取其他数据。也许你现在还比较困惑这一过程,别着急,后面有特别解释。

1.链表的初始化

其实可以从后往前看,这样更容易理解。INIT_LIST_HEAD函数形成一个空链表。这个list变量一般作为头指针(非头结点)。

  28static inline void INIT_LIST_HEAD(struct list_head *list)
  29{
  30        list->next = list;
  31        list->prev = list;
  32}

下面的宏生成一个头指针name,如何生成?请看LIST_HEAD_INIT(name)。

  25#define LIST_HEAD(name) \
  26        struct list_head name = LIST_HEAD_INIT(name)

LIST_HEAD_INIT(name)将name的地址直接分别赋值给next和prev,那么它们事实上都指向自己,也形成一个空链表。现在再回头看宏LIST_HEAD(name),它其实就是一个定义并初始化作用。

  23#define LIST_HEAD_INIT(name) { &(name), &(name) }

3.添加元素

这两个函数分别给链表头结点后,头结点前添加元素。前者可实现栈的添加元素,后者可实现队列的添加元素。
static inline void list_add(struct list_head *new, struct list_head *head);
static inline void list_add_tail(struct list_head *new, struct list_head *head);

这两个函数如何实现的?它们均调用的下面函数:

  41static inline void __list_add(struct list_head *new,
  42                              struct list_head *prev,
  43                              struct list_head *next)
  44{
  45        next->prev = new;
  46        new->next = next;
  47        new->prev = prev;
  48        prev->next = new;
  49}

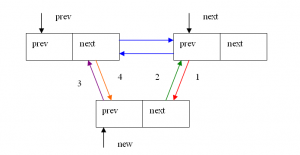
现在我们要关注的是,list_add和list_add_tail两函数在调用__list_add函数时,对应的各个参数分别是什么?通过下面所列代码,我们可以发现这里的参数运用的很巧妙,类似JAVA中的封装。

  64static inline void list_add(struct list_head *new, struct list_head *head)
  65{
  66        __list_add(new, head, head->next);
  67}

  78static inline void list_add_tail(struct list_head *new, struct list_head *head)
  79{
  80        __list_add(new, head->prev, head);
  81}

注意,这里的形参prev和next是两个连续的结点。这其实是数据结构中很普通的双链表元素添加问题,在此不再赘述。下面的图可供参考,图中1~4分别对应__list_add函数的四条语句。


3.删除元素

这里又是一个调用关系,__list_del函数具体的过程很简单,分别让entry节点的前后两个结点(prev和next)“越级”指向彼此。请注意这个函数的后两句话,它属于不安全的删除。

 103static inline void list_del(struct list_head *entry)
 104{
 105        __list_del(entry->prev, entry->next);
 106        entry->next = LIST_POISON1;
 107        entry->prev = LIST_POISON2;
 108}

想要安全的删除,那么可以调用下面函数。还记得INIT_LIST_HEAD(entry)吗,它可以使entry节点的两个指针指向自己。

 140static inline void list_del_init(struct list_head *entry)
 141{
 142        __list_del(entry->prev, entry->next);
 143        INIT_LIST_HEAD(entry);
 144}

4.替换元素

用new结点替换old结点同样很简单,几乎是在old->prev和old->next两结点之间插入一个new结点。画图即可理解。

120static inline void list_replace(struct list_head *old,
 121                                struct list_head *new)
 122{
 123        new->next = old->next;
 124        new->next->prev = new;
 125        new->prev = old->prev;
 126        new->prev->next = new;
 127}

同样,想要安全替换,可以调用:

 129static inline void list_replace_init(struct list_head *old,
 130                                        struct list_head *new)
 131{
 132        list_replace(old, new);
 133        INIT_LIST_HEAD(old);
 134}

5.移动元素

理解了删除和增加结点,那么将一个节点移动到链表中另一个位置,其实就很清晰了。list_move函数最终调用的是__list_add(list,head,head->next),实现将list移动到头结点之后;而list_move_tail函数最终调用__list_add_tail(list,head->prev,head),实现将list节点移动到链表末尾。

 151static inline void list_move(struct list_head *list, struct list_head *head)
 152{
 153        __list_del(list->prev, list->next);
 154        list_add(list, head);
 155}
 156

 162static inline void list_move_tail(struct list_head *list,
 163                                  struct list_head *head)
 164{
 165        __list_del(list->prev, list->next);
 166        list_add_tail(list, head);
 167}

6.测试函数

接下来的几个测试函数,基本上是“代码如其名”。

list_is_last函数是测试list是否为链表head的最后一个节点。

 174static inline int list_is_last(const struct list_head *list,
 175                                const struct list_head *head)
 176{
 177        return list->next == head;
 178}

下面的函数是测试head链表是否为空链表。注意这个list_empty_careful函数,他比list_empty函数“仔细”在那里呢?前者只是认为只要一个结点的next指针指向头指针就算为空,但是后者还要去检查头节点的prev指针是否也指向头结点。另外,这种仔细也是有条件的,只有在删除节点时用list_del_init(),才能确保检测成功。

 184static inline int list_empty(const struct list_head *head)
 185{
 186        return head->next == head;
 187}

 202static inline int list_empty_careful(const struct list_head *head)
 203{
 204        struct list_head *next = head->next;
 205        return (next == head) && (next == head->prev);
 206}

下面的函数是测试head链表是否只有一个结点:这个链表既不能是空而且head前后的两个结点都得是同一个结点。

226static inline int list_is_singular(const struct list_head *head)
227{
228        return !list_empty(head) && (head->next == head->prev);
229}

7.将链表左转180度

正如注释说明的那样,此函数会将这个链表以head为转动点,左转180度。整个过程就是将head后的结点不断的移动到head结点的最左端。如果是单个结点那么返回真,否则假。

212static inline void list_rotate_left(struct list_head *head)
213{
214        struct list_head *first;
215
216        if (!list_empty(head)) {
217                first = head->next;
218                list_move_tail(first, head);
219        }
220}

上述函数每次都调用 list_move_tail(first, head);其实我们将其分解到“最小”,那么这个函数每次最终调用的都是:__list_del(first->prev,first->next);和__list_add(list,head->prev,head);这样看起来其实就一目了然了。

8.将链表一分为二

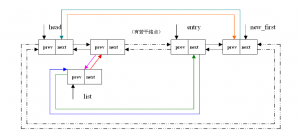
这个函数是将head后至entry之间(包括entry)的所有结点都“切开”,让他们成为一个以list为头结点的新链表。我们先从宏观上看,如果head本身是一个空链表则失败;如果head是一个单结点链表而且entry所指的那个结点又不再这个链表中,也失败;当entry恰好就是头结点,那么直接初始化list,为什么?因为按照刚才所说的切割规则,从head后到entry前事实上就是空结点。如果上述条件都不符合,那么就可以放心的“切割”了。

257static inline void list_cut_position(struct list_head *list,
258                struct list_head *head, struct list_head *entry)
259{
260        if (list_empty(head))
261                return;
262        if (list_is_singular(head) &&
263                (head->next != entry && head != entry))
264                return;
265        if (entry == head)
266                INIT_LIST_HEAD(list);
267        else
268                __list_cut_position(list, head, entry);
269}

具体如何切割,这里的代码貌似很麻烦,可是我们画出图后,就“一切尽在不言中”了。

231static inline void __list_cut_position(struct list_head *list,
232                struct list_head *head, struct list_head *entry)
233{
234        struct list_head *new_first = entry->next;
235        list->next = head->next;
236        list->next->prev = list;
237        list->prev = entry;
238        entry->next = list;
239        head->next = new_first;
240        new_first->prev = head;
241}

图示:

windows 7 ultimate product key

windows 7 ultimate product key

winrar download free

winrar download free

winzip registration code

winzip registration code

winzip free download

winzip free download

winzip activation code

winzip activation code

windows 7 key generator

windows 7 key generator

winzip freeware

winzip freeware

winzip free download full version

winzip free download full version

free winrar download

free winrar download

free winrar

free winrar

windows 7 crack

windows 7 crack

windows xp product key

windows xp product key

windows 7 activation crack

windows7 activation crack

free winzip

free winzip

winrar free download

winrar free download

winrar free

winrar free

download winrar free

download winrar free

windows 7 product key

windows 7 product key