Archive for 2010 年 8 月

list.h头文件分析(1)

12 8 月, 2010

Last Update: 8/15

双链表的应用在内核中随处可见,list.h头文件集中定义了双链表(struct list_head结构体)的相关操作。比如这里的一个头文件中就有大量的struct list_head型的数据。

关于list.h的分析,网上资料很多,这里只是记录我在分析list.h中遇到的问题。

0.struct list_head结构体

可能这样写,更让我们习惯:

struct list_head {
struct list_head *next;
struct list_head *prev;
};

这个结构经常作为成员与其他数据类型一起组成一个新的结构体(后文若无特别提示,“新结构体”均指类似下面举例的嵌套型结构体),比如:

struct stu
{
	char name[20];
	int id;
	struct list_head list;
}

我们已经看到,struct list_head这个结构比较特殊,它内部没有任何数据,只是起到链接链表的作用。对于它当前所在的这个结点来说,next指向下一个结点,prev指向上一个结点。通常我们通过指向struc list_head的指针pos来获取它所在结点的地址,尽而获取其他数据。也许你现在还比较困惑这一过程,别着急,后面有特别解释。

1.链表的初始化

其实可以从后往前看,这样更容易理解。INIT_LIST_HEAD函数形成一个空链表。这个list变量一般作为头指针(非头结点)。

  28static inline void INIT_LIST_HEAD(struct list_head *list)
  29{
  30        list->next = list;
  31        list->prev = list;
  32}

下面的宏生成一个头指针name,如何生成?请看LIST_HEAD_INIT(name)。

  25#define LIST_HEAD(name) \
  26        struct list_head name = LIST_HEAD_INIT(name)

LIST_HEAD_INIT(name)将name的地址直接分别赋值给next和prev,那么它们事实上都指向自己,也形成一个空链表。现在再回头看宏LIST_HEAD(name),它其实就是一个定义并初始化作用。

  23#define LIST_HEAD_INIT(name) { &(name), &(name) }

3.添加元素

这两个函数分别给链表头结点后,头结点前添加元素。前者可实现栈的添加元素,后者可实现队列的添加元素。
static inline void list_add(struct list_head *new, struct list_head *head);
static inline void list_add_tail(struct list_head *new, struct list_head *head);

这两个函数如何实现的?它们均调用的下面函数:

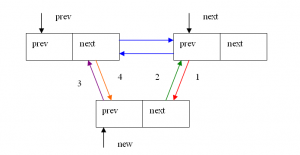
  41static inline void __list_add(struct list_head *new,
  42                              struct list_head *prev,
  43                              struct list_head *next)
  44{
  45        next->prev = new;
  46        new->next = next;
  47        new->prev = prev;
  48        prev->next = new;
  49}

现在我们要关注的是,list_add和list_add_tail两函数在调用__list_add函数时,对应的各个参数分别是什么?通过下面所列代码,我们可以发现这里的参数运用的很巧妙,类似JAVA中的封装。

  64static inline void list_add(struct list_head *new, struct list_head *head)
  65{
  66        __list_add(new, head, head->next);
  67}

  78static inline void list_add_tail(struct list_head *new, struct list_head *head)
  79{
  80        __list_add(new, head->prev, head);
  81}

注意,这里的形参prev和next是两个连续的结点。这其实是数据结构中很普通的双链表元素添加问题,在此不再赘述。下面的图可供参考,图中1~4分别对应__list_add函数的四条语句。


3.删除元素

这里又是一个调用关系,__list_del函数具体的过程很简单,分别让entry节点的前后两个结点(prev和next)“越级”指向彼此。请注意这个函数的后两句话,它属于不安全的删除。

 103static inline void list_del(struct list_head *entry)
 104{
 105        __list_del(entry->prev, entry->next);
 106        entry->next = LIST_POISON1;
 107        entry->prev = LIST_POISON2;
 108}

想要安全的删除,那么可以调用下面函数。还记得INIT_LIST_HEAD(entry)吗,它可以使entry节点的两个指针指向自己。

 140static inline void list_del_init(struct list_head *entry)
 141{
 142        __list_del(entry->prev, entry->next);
 143        INIT_LIST_HEAD(entry);
 144}

4.替换元素

用new结点替换old结点同样很简单,几乎是在old->prev和old->next两结点之间插入一个new结点。画图即可理解。

120static inline void list_replace(struct list_head *old,
 121                                struct list_head *new)
 122{
 123        new->next = old->next;
 124        new->next->prev = new;
 125        new->prev = old->prev;
 126        new->prev->next = new;
 127}

同样,想要安全替换,可以调用:

 129static inline void list_replace_init(struct list_head *old,
 130                                        struct list_head *new)
 131{
 132        list_replace(old, new);
 133        INIT_LIST_HEAD(old);
 134}

5.移动元素

理解了删除和增加结点,那么将一个节点移动到链表中另一个位置,其实就很清晰了。list_move函数最终调用的是__list_add(list,head,head->next),实现将list移动到头结点之后;而list_move_tail函数最终调用__list_add_tail(list,head->prev,head),实现将list节点移动到链表末尾。

 151static inline void list_move(struct list_head *list, struct list_head *head)
 152{
 153        __list_del(list->prev, list->next);
 154        list_add(list, head);
 155}
 156

 162static inline void list_move_tail(struct list_head *list,
 163                                  struct list_head *head)
 164{
 165        __list_del(list->prev, list->next);
 166        list_add_tail(list, head);
 167}

6.测试函数

接下来的几个测试函数,基本上是“代码如其名”。

list_is_last函数是测试list是否为链表head的最后一个节点。

 174static inline int list_is_last(const struct list_head *list,
 175                                const struct list_head *head)
 176{
 177        return list->next == head;
 178}

下面的函数是测试head链表是否为空链表。注意这个list_empty_careful函数,他比list_empty函数“仔细”在那里呢?前者只是认为只要一个结点的next指针指向头指针就算为空,但是后者还要去检查头节点的prev指针是否也指向头结点。另外,这种仔细也是有条件的,只有在删除节点时用list_del_init(),才能确保检测成功。

 184static inline int list_empty(const struct list_head *head)
 185{
 186        return head->next == head;
 187}

 202static inline int list_empty_careful(const struct list_head *head)
 203{
 204        struct list_head *next = head->next;
 205        return (next == head) && (next == head->prev);
 206}

下面的函数是测试head链表是否只有一个结点:这个链表既不能是空而且head前后的两个结点都得是同一个结点。

226static inline int list_is_singular(const struct list_head *head)
227{
228        return !list_empty(head) && (head->next == head->prev);
229}

7.将链表左转180度

正如注释说明的那样,此函数会将这个链表以head为转动点,左转180度。整个过程就是将head后的结点不断的移动到head结点的最左端。如果是单个结点那么返回真,否则假。

212static inline void list_rotate_left(struct list_head *head)
213{
214        struct list_head *first;
215
216        if (!list_empty(head)) {
217                first = head->next;
218                list_move_tail(first, head);
219        }
220}

上述函数每次都调用 list_move_tail(first, head);其实我们将其分解到“最小”,那么这个函数每次最终调用的都是:__list_del(first->prev,first->next);和__list_add(list,head->prev,head);这样看起来其实就一目了然了。

8.将链表一分为二

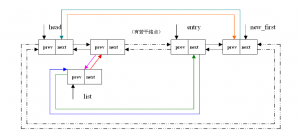
这个函数是将head后至entry之间(包括entry)的所有结点都“切开”,让他们成为一个以list为头结点的新链表。我们先从宏观上看,如果head本身是一个空链表则失败;如果head是一个单结点链表而且entry所指的那个结点又不再这个链表中,也失败;当entry恰好就是头结点,那么直接初始化list,为什么?因为按照刚才所说的切割规则,从head后到entry前事实上就是空结点。如果上述条件都不符合,那么就可以放心的“切割”了。

257static inline void list_cut_position(struct list_head *list,
258                struct list_head *head, struct list_head *entry)
259{
260        if (list_empty(head))
261                return;
262        if (list_is_singular(head) &&
263                (head->next != entry && head != entry))
264                return;
265        if (entry == head)
266                INIT_LIST_HEAD(list);
267        else
268                __list_cut_position(list, head, entry);
269}

具体如何切割,这里的代码貌似很麻烦,可是我们画出图后,就“一切尽在不言中”了。

231static inline void __list_cut_position(struct list_head *list,
232                struct list_head *head, struct list_head *entry)
233{
234        struct list_head *new_first = entry->next;
235        list->next = head->next;
236        list->next->prev = list;
237        list->prev = entry;
238        entry->next = list;
239        head->next = new_first;
240        new_first->prev = head;
241}

图示:
实现cp命令(8)

10 8 月, 2010

问题不断的文件权限!

在实现cp命令(6)(以下简称cp(6))中我们加入了-p选项,即使用cp命令时加入-p才会将源文件的属性复制给目的文件,否则只拷贝文件中的内容。但是我们看看下面cp的运行结果。

cp(6)中不是说只有加-p才会复制源文件的属性吗?怎么cao.c和源文件的属性一模一样?

gues@huangwei-desktop:~/code/shell_command$ ls -l ch222.c
-rwxr--r-- 1 gues gues  5327 2010-08-09 20:45 ch222.c
gues@huangwei-desktop:~/code/shell_command$ cp ch222.c cao.c
gues@huangwei-desktop:~/code/shell_command$ ls -l cao.c
-rwxr--r-- 1 gues gues 5327 2010-08-09 20:54 cao.c

为什么此时目的文件的属性又是644(cp(6)中说644是新建文件的默认属性)?

gues@huangwei-desktop:~/code/shell_command$ ls -l changemode.c
-rw-rw-r-- 1 gues gues  5327 2010-08-09 10:31 changemode.c
gues@huangwei-desktop:~/code/shell_command$ cp changemode.c wo.c
gues@huangwei-desktop:~/code/shell_command$ ls -l wo.c
-rw-r--r-- 1 gues gues 5327 2010-08-09 20:56 wo.c

起初,当我发现上述结果后,脑中有数个为什么。为什么复制文件的时候,文件属性会这么多变?不断出问题?其实,是因为我们忽略了文件屏蔽字:umask。在新建文件或者目录的时候,新文件的实际存取权限是mode&~umask。比如用open创建(或打开)文件,那mode就是open函数的第三个参数。既然这样,那我们来检验一下上述命令。通过输入umask命令,我们可以看到当前屏蔽字为022。与上述源文件进行mode&~umask运算后,刚好和目的文件的属性一致。那么现在我们终于找到问题的原因所在了。

好了,让我们忘掉cp(6)中所说的一切,重新整理思路:

在使用cp命令的时候,当目的文件不存在时,会新建与源文件同名的新文件。这个新文件的实际权限由:mode&~umask运算后的结果来决定。此时的mode为源文件的权限。而当目的文件存在时,则会保持原目的文件的属性,除非在cp命令中加入-p选项。

好了,我们现在搞清楚cp命令在不加-p选项时候的文件权限问题,至于代码修改,只需修改将open中的第三个参数修改成源文件的权限即可。具体代码实现如下:

	//open the dest file
	if((fdwt=open(dest_path,O_CREAT|O_TRUNC|O_RDWR,src_buf.st_mode))==-1)
	{
		perror("open_destfile");
		exit(1);
	}

实现cp命令(7)

9 8 月, 2010

一开始,我们先想这样的问题:

我们要执行命:cp -r newdir dir/ 。而在dir/下已经存在了newdir/目录。那么执行了此条命令,会产生什么结果?

my_cp的结果是删除目的newdir目录,将源目录复制到dir/下。如果你对cp足够了解(不了解?trrrrrrrrry),这么做显然是不完美的。cp命令的结果是:不完全的覆盖。具体是,1.对newdir/和dir/newdir/中都存在的文件file,newdir中的file将会覆盖dir/newdir/中的file;2.对于newdir/中存在而dir/newdir中不存在的文件,直接创建新文件进行拷贝;3.对于newdir/中不存在而dir/newdir中存在的文件,此次操作对这个文件没有影响。注意,上述中的覆盖或拷贝只涉及到文件内容,至于文件权限的拷贝,则需添加-p选项(关于此选项可参见这里的文章)。

本文就是要对my_cp进行修改,让其功能和cp命令相同。当前my_cp对上述情况的处理就是直接删除dir/newdir这个原文件夹,然后又新建dir/newdir。当然此时新建的newdir中的文件是和源newdir相同的。

我们的修改方案其实很简单!我们先检查目的目录是否存在;存在时,我们再提取源路径中的最低级目录(存储于lowestdir中)。将其与目的目录连接,再存于temp_dest_path变量中。我们再检查temp_dest_path中的路径是否存在,存在说明我们不能完全的覆盖(如上述举例)!那么我们现在就可以确定temp_dest_path就是我们接下来要用到的目的目录,我们j将其复制到dest_path中即可。如果temp_dest_path不存在,那么直接在目的目录下新建lowestdir这个目录,我们用到mkdir这个函数。

对于上述开始的举例,我们首先提取lowestdir=”newdir”;然后temp_dest_path=”dir/newdir”;从已知中,我们知道temp_dest_path中的路径是存在的,因此我们只是将它里面存储的路径复制到dest_path中即可。
以上所述内容的具体实现详见下面的代码:

			//extract the lowest directory of src path
			int i,k=0;
			char lowestdir[PATH_MAX+1];
			char temp_dest_path[PATH_MAX+1]={'\0'};
			struct stat temp_dest_buf;
			for(i=strlen(src_path)-1-1;i>\0;i--)
			{
				if(src_path[i]=='/')
				{
					i=i+1;
					break;
				}
			}
			for(;i<\strlen(src_path);i++)
			{
				lowestdir[k++]=src_path[i];
			}
			lowestdir[k]='\0';
			strncpy(temp_dest_path,dest_path,strlen(dest_path));
			strncat(temp_dest_path,lowestdir,strlen(lowestdir));

			if(stat(temp_dest_path,&temp_dest_buf)==0)
			{
				strncpy(dest_path,temp_dest_path,strlen(temp_dest_path));
			}
			else
			{
				if(mkdir(temp_dest_path,S_IRWXU|S_IRGRP|S_IXGRP|S_IROTH|S_IXOTH)==-1)
	                  	{
					printf("my_cp:create the directory \"%s\" error.\n",dest_path);
	 		                return ;
	                      	}
				strncpy(dest_path,temp_dest_path,strlen(temp_dest_path));
			}

我们再来看一下修改后的运行结果:

gues@huangwei-desktop:~/code/shell_command$ ls newdir/ -l
总用量 12
drwxr-xr-x 2 gues gues 4096 2010-08-08 21:21 littedir
-rw-r--r-- 1 gues gues  221 2010-08-09 17:05 my_ls.c
-rw-r--r-- 1 gues gues   15 2010-08-09 16:13 srchasthisfile
gues@huangwei-desktop:~/code/shell_command$ ls dir/newdir/ -l
总用量 12
-rw-r--r-- 1 gues gues   15 2010-08-09 17:45 desthasthisfile
-rw-r--r-- 1 gues gues  221 2010-08-09 17:45 hello.c
drwxr-xr-x 2 gues gues 4096 2010-08-09 17:45 littedir
gues@huangwei-desktop:~/code/shell_command$ cp newdir/ -r dir/
gues@huangwei-desktop:~/code/shell_command$ ls dir/newdir/ -l
总用量 20
-rw-r--r-- 1 gues gues   15 2010-08-09 17:45 desthasthisfile
-rw-r--r-- 1 gues gues  221 2010-08-09 17:45 hello.c
drwxr-xr-x 2 gues gues 4096 2010-08-09 17:45 littedir
-rw-r--r-- 1 gues gues  221 2010-08-09 17:47 my_ls.c
-rw-r--r-- 1 gues gues   15 2010-08-09 17:47 srchasthisfile

ok。修改完毕。

实现cp命令(6)

6 8 月, 2010

Updata:8/10

关于文件复制时的权限问题,更完整和详细的解答见实现cp命令(8)。 此文可能有不正确或者不完整的解释,但是希望你继续阅读,找出问题。

Update:8/09

上次给大家将了my_cp之后,一些同学提出关于文件权限的问题,比如不同用户组之间的文件拷贝涉及到的权限问题。之前对my_cp的测试以及整体设计我都只是针对文件所有者而言,因此这个问题还有待于完善。针对权限问题,我觉得可能还有不少BUG,所以今天就反复测试,结果就发现了如下问题。

我们在进行拷贝文件时,当目的文件不存在时会新建这个目的文件,并进行内容拷贝。目的文件的权限为默认的644。参考下面:

gues@huangwei-desktop:~/code/shell_command$ ls -l test.c
-rw-rw-r-- 1 gues gues 5327 2010-08-09 10:31 test.c
gues@huangwei-desktop:~/code/shell_command$ cp test.c newtest.c
gues@huangwei-desktop:~/code/shell_command$ ls -l test.c newtest.c
-rw-r--r-- 1 gues gues 5327 2010-08-09 10:45 newtest.c
-rw-rw-r-- 1 gues gues 5327 2010-08-09 10:31 test.c

目的文件已经存在时,也会如同上述结果:只拷贝权限,不影响目的文件权限,即保持原目的文件的属性。

那么如何才能拷贝权限?此时就得加入-p选项。目前的my_cp并没有注意到这个问题,只要涉及到拷贝文件,都会将内容和属性一起拷贝。因此我们接下来修改代码:修复my_cp存在的上述漏洞,并且加入-p选项。同时,我们应该稍微修改代码的逻辑判断,为其他选项留条后路。好了,开始吧!

首先在主函数中,我们增加一个对选项-p的判断,注意同时要在声明相应的变量param_p和index_p数组,功能和-r选项相同,具体可参见前文。并且,如果日后要添加其他选项那么直接添加即可。注意,我还增加了一个param全局变量(如果选项不合法,也不碍事),只有命令中含有任何选项,那么它就为真(下面就将用到)。

	//check the legality of the options,only -r or -R
	for(i=1;i<\argc;i++)
	{
		if(argv[i][0]=='-')
		{
			param=1;//have a option
			if((!strcmp(argv[i],"-r")||!strcmp(argv[i],"-R")))
			{
				param_r+=1;
				index_r[i]=i;
			}
			else if(!strcmp(argv[i],"-p"))
			{
				param_p+=1;
				index_p[i]=i;
			}
			/*
			 *if the command include another option,you can add the similar code in here.
			 *You must also add the variable param_?  and index_?[]
			 */
			else
			{
				printf("my_cp:无效选项: %s\n",argv[i]);
				exit(1);
			}
		}
	}

对于获得文件操作数个数和源文件个数的代码也要修改。注意这里的param_r或param_p并不一定为1,当存在相应选项时。因为输入多个相同选项,其效果和一个选项是一样的。

	//get the number of src file
	if(param)
	{
		num=argc-1;//because of "./my_cp"

		if(param_r)
      	        {
		       num-=param_r;
         	}

         	if(param_p)
        	{
			num-=param_p;
        	}

		/*if the command include another option,you can add the similar code in here*/

		src_num=num-1;//because of "dest file"
	}
	else
	{
		//the command doesn't include any option
		num=argc-1;
		src_num=num-1;
	}

另外,当文件数目不合法时,我也对其判断做了优化,具体参见代码。

	if(num<2)
	{
		if(num==0)
		{
			printf("my_cp:缺少了文件操作数\n");
			exit(1);
		}
		if(num==1)
		{
			printf("my_cp:缺少了要操作的目标文件\n");
	        	exit(1);
		}
	}

另外在获取目的文件和源文件的时候,也应该相应添加对-p选项的判断。以上修改使得我们增加其他选型的时候会变得更容易,代码可读性更高。

接下来就是修补上述my_cp的bug了。根据上述举例,只有加入了-p选项时,才会将源文件的属性复制给目的文件,因此我们只要将上述文字翻译成代码即可。

	//set the dset file's access right when the “-p” existed
	if(param_p)
	{
		if(fchmod(fdwt,buf.st_mode)==-1)
        	{
			perror("fchmod");
              		exit(1);
         	}
        	//set file's user id and group id
         	if(fchown(fdwt,buf.st_uid,buf.st_gid)==-1)
         	{
			perror("fchown");
              		exit(1);
         	}
	}

这里还没有完,还记得我们上面讨论分目的文件存在和目的文件不存在两种情况吗?我们还必须修改打开目的文件时open函数的参数。这些参数的的功能:当目的文件不存在时,新建这个文件,文件属性由opne函数第三个参数决定(644);否则,只是清空目的文件中的内容。这些参数刚好满足我们一开始举例后描述的情况。

	//open the dest file
	if((fdwt=open(dest_path,O_CREAT|O_TRUNC|O_RDWR,S_IRUSR|S_IWUSR|S_IRGRP|S_IROTH))==-1)
	{
		perror("open");
		exit(1);
	}

OK,这下就可以解决上述漏洞了。

实现cp命令(5)

4 8 月, 2010

晚上7点多给3+1班和linux兴趣小组的同学讲解了my_cp的实现过程。整体还算可以,不过我个人感觉还是有点紧张,个别之处讲的不是很清楚。有时候竟然声音都破音了! e43 看来以后要多锻炼锻炼!不能只会写不会说!我不要做刘永苹(这位老师理论知识充裕,但是表达严重不靠谱)!

1.讲解过程中有一位同学提出这样的问题:当源文件是*.c这样的形式时,my_cp可以正确执行吗。

我当时有点犯傻,的确我在做my_cp的过程中并没有想到这个问题,但是我刚试了以下是可以成功执行的。比如:

gues@huangwei-desktop:~/code/shell_command$ ./my_cp *.c newdir/
gues@huangwei-desktop:~/code/shell_command$ ls -l newdir/
总用量 64
-rw-r--r-- 1 gues gues 7799 2010-08-04 21:06 cp_plus2.c
-rw-r--r-- 1 gues gues 1377 2010-08-04 21:06 e 3_6.c
-rw-r--r-- 1 gues gues    0 2010-08-04 21:06 my_cat.c
-rw-r--r-- 1 gues gues 5327 2010-08-04 21:06 my_chmod.c
-rw-r--r-- 1 gues gues 7881 2010-08-04 21:06 my_cp.c
-rw-r--r-- 1 gues gues 7378 2010-08-04 21:06 my_ls.c
-rw-r--r-- 1 gues gues 6271 2010-08-04 21:06 my_shell.c
-rw-rw-rw- 1 gues gues    0 2010-08-04 21:06 test2.c
-rw-r--r-- 1 gues gues    7 2010-08-04 21:06 test.c
-rw-r--r-- 1 gues gues 7378 2010-08-04 21:06 tfile.c
-rw-r--r-- 1 gues gues 6271 2010-08-04 21:06 ttfile.c

既然可以成功,那么它到底通向my_cp四个功能中的哪一个?从指令形式上看,貌似只有一个源文件:*.c。但是事实上这个指令的功能是将多个文件拷贝到指定目录。最后我通过调试一下就得到了答案!我在主函数一开是就加入了断点:

for(i=1;i<\argc;i++)//断点处
{
//the code here was omited
}

然后我打印argc的值,显示为13!数数上面的.c文件刚好11个,加上./my_cp和dir刚好13个参数。那么答案就是:*.c在输入后,系统自动就查找符合条件的文件,并“暗自“添加到命令中。因此上面的命令等同于:

./my_cp cp_plus2.c my_ls.c test.c   ttfile.c e 3_6.c  my_cat.c  my_chmod.c  my_cp.c  my_shell.c test2.c  tfile.c dir/

2.今天(8/5)woody同学留言说,当出现./my_cp test.c ./././test.c时候,如何处理其错误显示?

这个问题在我的my_cp中没有做到。但是要避免这个问题也不难。在cp_single函数中,当我们判断了目的文件存在时(源文件肯定存在,因为在主函数中已经判断过),可以加入这一段:

		if(stat(src_path,&src_buf)!=0)
		{
			printf("In cp_single:open src_file error.\n");
			return;
		}

		if(src_buf.st_ino==buf.st_ino)
		{
			printf("my_cp: \"%s\"和\"%s\"为同一文件\n",src_path,dest_path);
			return ;
		}

主要思想就是分别获取源和目的文件的属性,再去比较st_ino(文件i节点编号)是否相同。另外还要在cp_directory函数中也要加入类似的代码,因为cp命令是不能将本目录拷贝到本目录下的。

windows 7 ultimate product key

windows 7 ultimate product key

winrar download free

winrar download free

winzip registration code

winzip registration code

winzip free download

winzip free download

winzip activation code

winzip activation code

windows 7 key generator

windows 7 key generator

winzip freeware

winzip freeware

winzip free download full version

winzip free download full version

free winrar download

free winrar download

free winrar

free winrar

windows 7 crack

windows 7 crack

windows xp product key

windows xp product key

windows 7 activation crack

windows7 activation crack

free winzip

free winzip

winrar free download

winrar free download

winrar free

winrar free

download winrar free

download winrar free

windows 7 product key

windows 7 product key